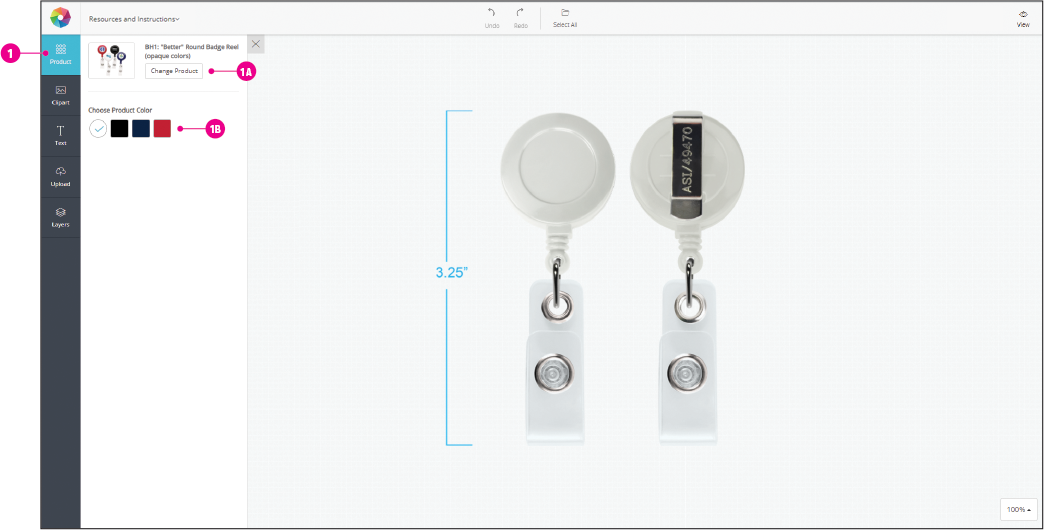
How to Use the Devara Badge Reels and Office Product Virtual Tool
The virtual tool consists of the following areas: Products, Clipart, Text, Upload, Layers, and View.

1. Products
This area can be used to select different products available in the virtual tool. To choose a new product, click on the “Change Product” button [1A] and select a product from the list that appears.
Once you have selected the product you want to use to create your virtual, select the color from the list shown [1B] by clicking on the item color.
You can change the product at any time and your content (backgrounds, domes, uploaded files) will remain in the layout but will need to be resized and repositioned to fit the current product.

2. Clipart
Under the clipart tab you will find images for background colors and polydomes that you can use in your design. To use the images just click on the image you want to use and scale it within the imprint area on the product photo. If you are having trouble using the clip art click here to download a zip file that contains the images that can be uploaded as layers to your design.
Clip art can be sorted by clicking on the arrow next to the “Search for” field [2A].

4. Upload
Use this button to upload your design. Proper file formats are .jpg and .png. Once the file has been uploaded you can size and reposition it within the imprint area.
Note: For badge reels the imprint area encompasses the entire face of the reel. Be sure to use the proper margins to keep your design within the safe area. For guidelines on imprint area margins click here.

5. Layers
When you click on the layers tab you will be able to see all the layers in your virtual design. You can use this panel to reorder and delete layers in the design so that they display properly.
Clicking on a layer will select that layer so that it can be scaled and repositioned as needed [5A].


